This article shows two ways to “use” James Webb Space Telescope (JWST) images for your own learning and image processing practice. The first route is very quick: you start from ready-made layers and experiment with color mapping. The second route is more advanced: you download calibrated FITS data from NASA’s archive and build the image yourself in PixInsight (or another tool of your choice).
1. Recolor ready-made image layers
JWST operates mainly in the infrared. The detector records information at wavelengths the human eye cannot see, so the final public images are always the result of a mapping process: different filters are assigned to visible colors. A common principle is to map shorter wavelengths to bluer colors and longer wavelengths to redder colors, but there is room for artistic and educational choices.
NASA/ESA often publish image “assets” (for example, layered files) that allow you to experiment with the colors yourself. With these, you can very quickly try different looks and learn how color mapping changes the perceived structure.
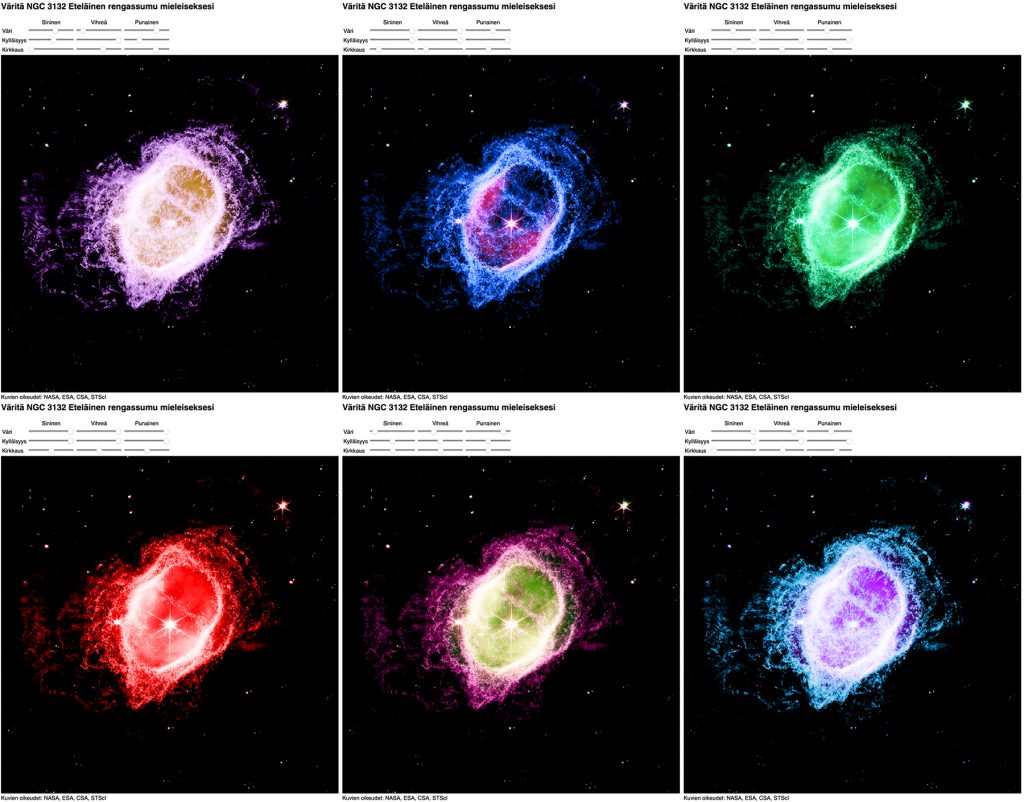
A good way to practice is to pick a few familiar targets and try multiple color versions. The original Finnish article suggests three example sets to explore: the “Pillars of Creation” (M16), a star-forming region NGC 3324, and the Southern Ring Nebula (NGC 3132).
2. Download JWST FITS files and process them yourself
If you want to go deeper, you can download JWST observations as FITS files and process them yourself — much like you would process your own astrophotography data. The benefit is that you learn the full pipeline: selecting filters, combining channels, stretching, noise control, and finishing steps.
2.1 Getting the files from NASA/MAST
NASA provides JWST data through the MAST portal (Mikulski Archive for Space Telescopes). In practice you search for the target, choose an observation and then select the products you want to download. For image-building you typically want the calibrated products, not every intermediate file.
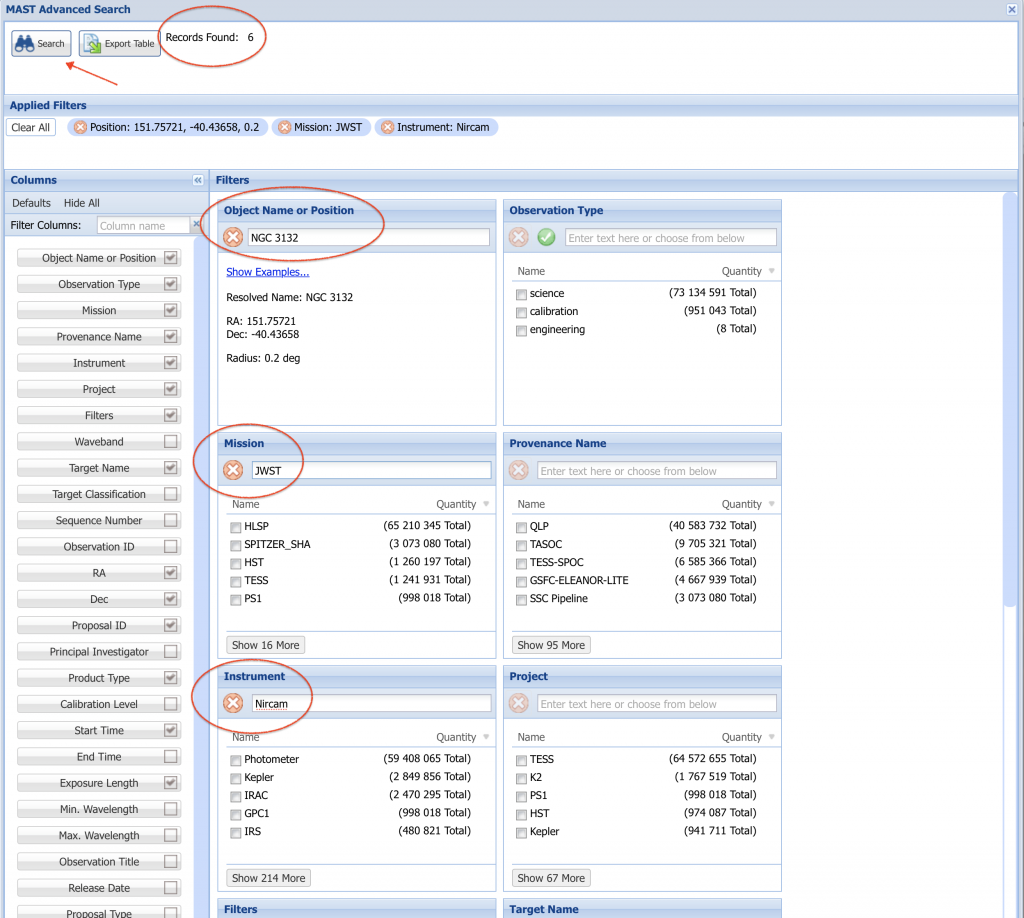
Let’s try searching for images of the Southern Ring Nebula from the portal. Clicking on Advanced search at the top of the page linked above will open a new dialog, Mast Advanced Search.
- Type JWST in the ‘Mission’ field on the right
- Type Nircam in the ‘Instrument’ field
- Type NGC3132 in the ‘Object Name or Position’ field
The number of files at the top of the page should now be 6. Finally, click ‘Search’ at the top
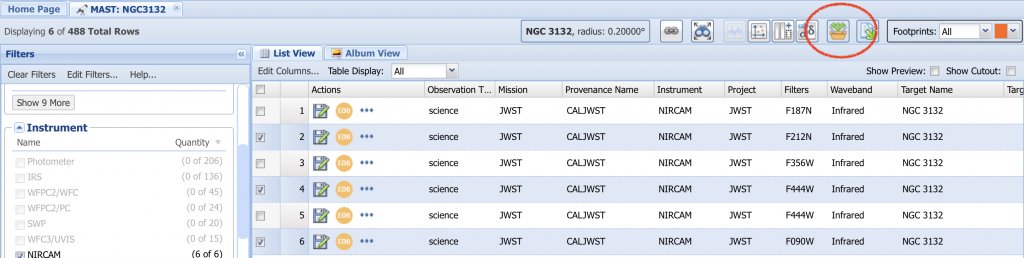
You will be presented with a tab with six files (Mast: NGC3132) from different filter results. However, this time three filters are selected, f090w for blue, f212n for green and f44w for red (the first one in the list is f444w, the second one is actually f444w – f470n, more information is behind the three-dot icon). Once you have selected these, you can transfer the data to the download basket by clicking on the basket icon at the top of the tab (Add data …)
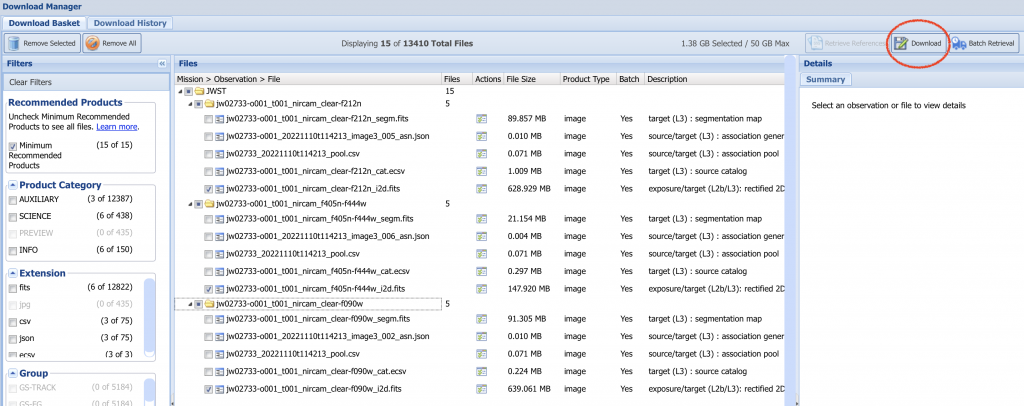
The file download window (Download Manager) will open and after a while the filters you selected will appear. It is still worth reducing the files and selecting only the files ending in i2d.fits to optimize the download time. The files take up a lot of space, these three alone are over one gigabyte in size and it is worth taking some time to download. Start the download by clicking the 'Download' button in the upper right corner.
FITS is an acronym for Flexible Image Transport System and, as the name suggests, is a highly flexible file format commonly used in astronomy.
2.2 A practical workflow in PixInsight
When the files are finally on your computer, they will be in a folder starting with MAST, and there in a JWST subfolder in each filter's own folder. Only the i2d.fits files are needed from these folders, so you can delete the other files.

PixInsight from Spanish company Pleiades Astrophoto is a program developed for processing images of the starry sky. It contains very versatile and powerful tools, but it also requires a lot of getting to know the subject. Due to the straightforward structure of the program, users can create advanced scripts themselves using the program's processes and tools.
Jarmo Ruuth's AutoIntegrate script is also responsible for this, using which we can display our images surprisingly easily.
The three files you saved are still compilation files, including 'unnecessary' files. Therefore, it is worth opening each file in turn in Pixinsight and deleting all others from the program, except for the file with the SCI code in the middle of its name. Deleting is done simply by clicking on the letter x in the upper left corner of each file. The files to be deleted are additional information used in calibration that is not necessarily needed in image processing.
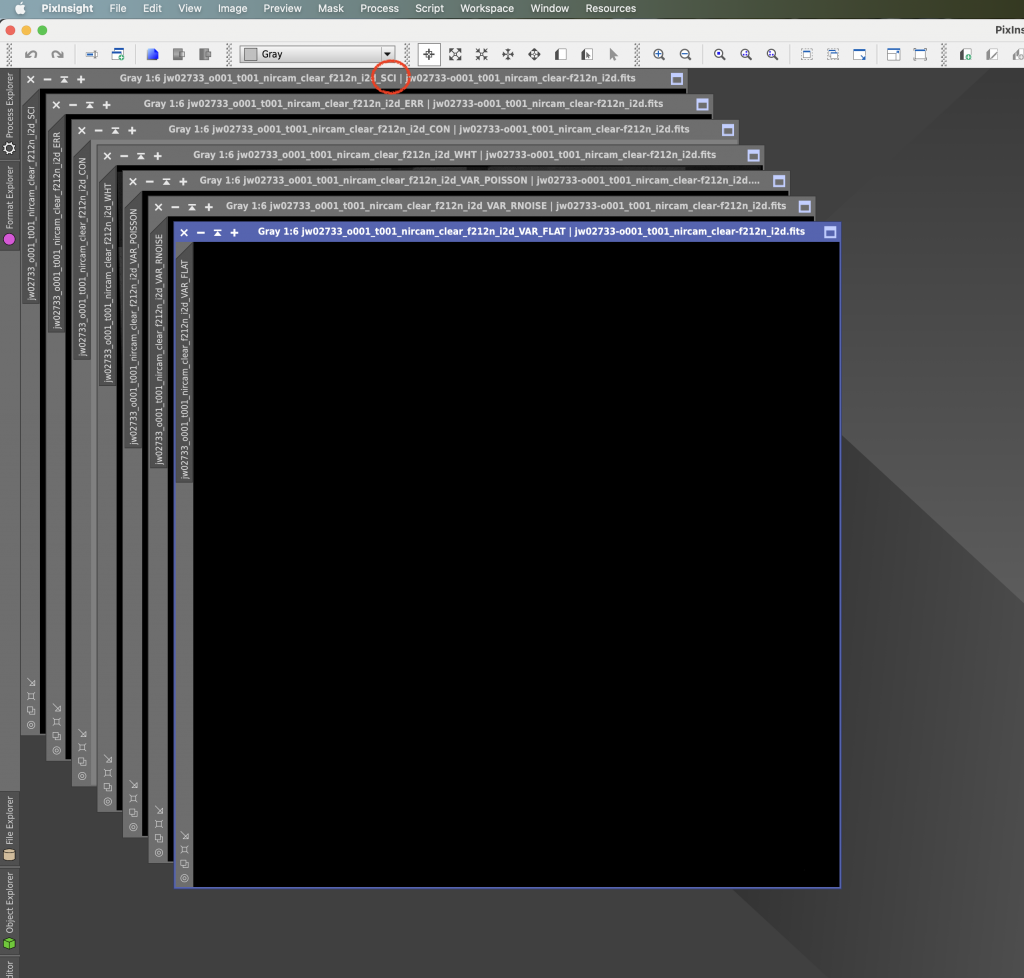
After this, save the remaining SCI file as a FITS file with default settings in a new folder. You can shorten the name if you want. Do the same with the other two assembly files and save their SCI files in the same folder. You can download the AutoIntegrate script from Jarmo's website. There are clear instructions for installing the script and he can also quickly help you with any problems. Next, open the script (Script menu) and select Add manually from the top right corner. After this, load the files red (R, f444w), green (G, f212n) and blue (B, f090w) in turn. Don't worry, even if the program complains about missing files from time to time, it just makes sure that all colors are loaded.
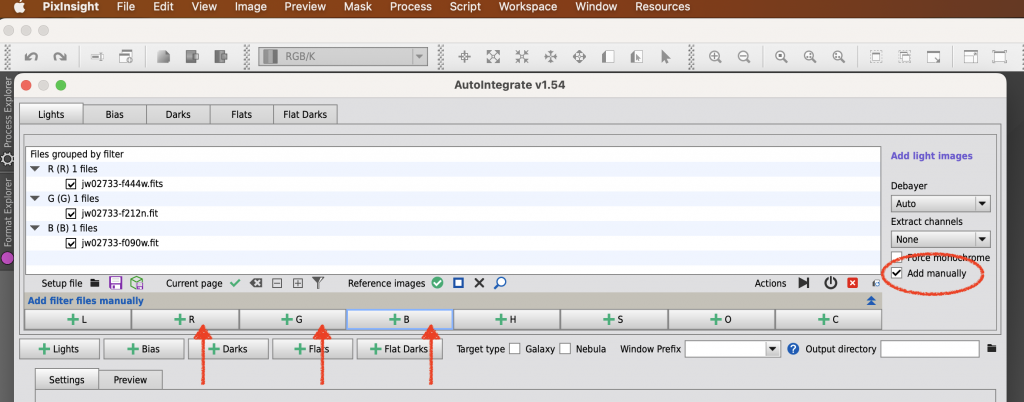
Since the JWST images are of high quality and pre-calibrated, the default settings of the AutoIntegrate script are already sufficient for image processing.
So after this, you just click on the ‘Run’ box at the bottom and wait for the final result. The program takes about five minutes to run, depending on your computer, and the result is an image that you can then continue with image processing. I usually save this as a tif image (16 bit), which I then open in Photoshop for finishing.
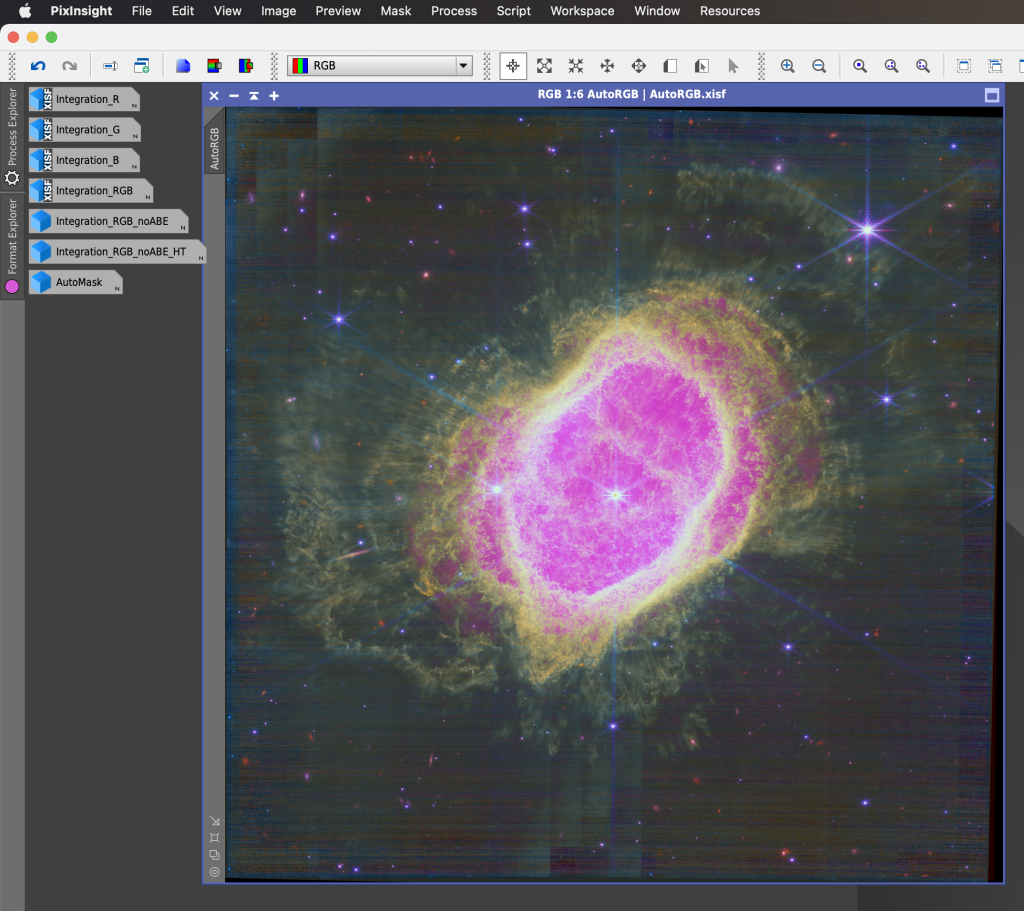
The key idea is: even though JWST data is “professional”, you can treat it as learning material for the same processing skills you use in amateur astrophotography — and by experimenting you will better understand how filters, wavelength mapping and processing choices shape the final image.
Pixinsight is quite expensive, $250 + VAT. Those considering it can get a free 45-day trial of the full version of the program. That's how I ended up using the program.
These retrieved images can of course be processed with other specialized image processing programs, as long as the images retrieved from NASA have been converted to the same size, aligned, and stretched from linear to nonlinear. The Astro Imaging Channel for stargazers TAIC and Eric Coles show in a video how to complete such images in Photoshop in 10 minutes.